XM-18K2 Egg Incubator Controller - Automatic Computer Control Incubator Controller XM 18 K2 for Egg Incubator (Original)
4800 Tk
| Product Name | XM-18K2 incubator controller |
| Dimensions (L x W x H) | 200mm x 165mm x 65mm |
| Color | White |
| Application | Egg incubators for chicken, duck, goose, and other poultry |
| Voltage | 220V 50Hz |
| Material | ABS |
| Egg Flip Mode | Automatic egg turning |
| Power Supply Type | Single power supply |
| Hatching Rate | 92-95% |
| Weight | 0.9 KG |
| Functions | Automatic temperature control, automatic humidity control, automatic egg turning |
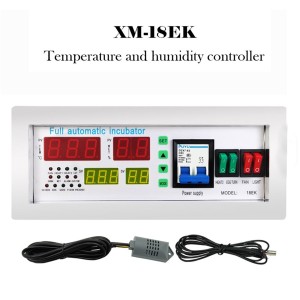
- AC220V, DC12V Indicator: Shows the current power source.
- Temperature Display: Shows the current temperature inside the incubator.
- Humidity Display: Shows the current humidity inside the incubator.
- Hatching Days Display: Shows the number of days since incubation started.
- Heating, Humidifying Indicator: Lights up when heating or humidifying elements are active.
- Temp Key: Used to set the target temperature.
- Humid Key: Used to set the target humidity.
- Turn Key: Manually activates the egg turning mechanism.
- Up Key: Increases values during setting.
- Down Key: Decreases values during setting.
- Mode Key: Cycles through different incubation modes (e.g., Chicken, Duck, Goose, Pigeon, Constant-Temperature).
- Lighting Key: Controls the internal incubator light (if connected).
- Cooling, Turning, Alarm, Chicken, Duck, Goose, Pigeon, Constant-Temperature Indicator: Various indicators for operational status and selected mode.
Connect the necessary components to the rear panel terminals as follows:
- AC220V Heater: Connect your incubator's heating element to these terminals.
- Battery Input (+12V, GND): For optional 12V DC backup power. Connect the positive (+) terminal of the battery to +12V and the negative (-) terminal to GND.
- 12V Fan: Connect the incubator's 12V fan to these terminals.
- Turning (AC12V): Connect the egg turning motor to these AC12V terminals.
- Cooling (AC12V): Connect a cooling fan or device to these AC12V terminals if your incubator requires active cooling.
- Lighting (AC12V): Connect an internal incubator light to these AC12V terminals.
- Temperature & Humidity Sensor Input: Connect the provided temperature and humidity sensor. Ensure correct polarity: Red, Black, Yellow, Blue wires should match the corresponding inputs.
- 220V Power: Connect the main 220V AC power cord to this input.
After all connections are secure, you may switch on the 'Power Supply' button on the rear panel.
User Tips
- Always refer to this manual for detailed instructions, especially for initial setup and wiring.
- For best results, allow the incubator to stabilize at the desired temperature and humidity for several hours before placing eggs inside.
- Monitor the incubator's environment regularly, especially during the first few days of incubation.
* অর্ডার কনফার্ম করতে আমাদের প্রতিনিধি কল করলে ডেলিভারি চার্জ দ্রুত পরিশোধ করার অনুরোধ করছি। ডেলিভারি চার্জ পরিশোধ ব্যতিত কোন অর্ডার কুরিয়ার করা হয় না। * কুরিয়ারের মাধ্যমে রিসিভকৃত পণ্যটি ভাংগা, নষ্ট, পুরাতন বা অর্ডারের সাথে মিল না থাকলে মেমো ও পণ্যের ছবি বা ভিডিও আমাদের হোয়াটস এ্যাপ নম্বরে পরবর্তি ২৪ ঘন্টার মধ্যে শেয়ার করুন। আশা করি, দ্রুতই সমাধান পাবেন।
Related Products
Free Delivery
On all order above BDT 50000
Easy 7 days replace
7 days Easy replace Guaranty. (ডিসি কারেন্ট সংযোগ দেওয়া যায় এমন পণ্য ব্যাতিত)
International Warranty
1 year official warranty (নির্দিষ্ট পণ্যের ক্ষেত্রে প্রযোজ্য)
Private2 100% secure checkout
COD/Mobile banking/visa