")
")
")
")
")
")
")
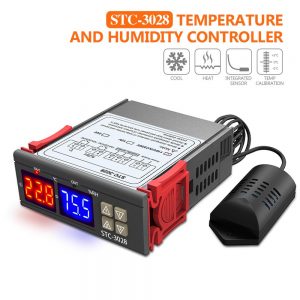
Description
How to use:
- Connect the power supply and the load, you can supply to the controller,Is displayed as a measured temperature,Press the SET button, the display flashes the temperature,Press + – to set the desired temperature,After setting press SET to confirm return,The controller automatically performs the relay by setting off!
- Lights, LED status descriptions:Indicator: Off The relay is switched off, Always indicate the relay is closed.LED: Shows LL is the sensor open, showing HH is out of range, the thermostat will be forced to close the relay, the display — as high temperature protection.
- Parameter Function:Long press SET 5 seconds to enter the main menu settings, press the + – toggle P0 … P8 long press SET or 10 seconds of no key activity confirmed their return to the controller
Code Code Description Setting range Factory setting __________________________________________________________________________________
1. Use Program
Connect the power supply and equipment, to the controller power supply, as measured temperature is displayed, press the SET button, the display temperature flashes, press “+” “-” to set the desired temperature (hold down the button 5 seconds more quickly lift). After setting press SET to confirm return, then the controller according to the set temperature automatically execute the relay off
2. Indicator, LED Status Description
Indicator: indicates relay is closed, Off means the relay has been disconnected
Digital: Displays the sensor 888 is open, follow the instructions to connect the sensor;
Show HHH for the excess of the maximum temperature of the measuring range, the thermostat will be forced off the relay;
Display L L L of the measuring range of the lowest temperature, the thermostat will be forced off the relay;
Display – – – high temperature alarm, thermostat will forcibly disconnect relay
3. Parameter Functio
Press SET button for 5 seconds to enter the main menu settings, press the “+” “-” Switching P0-P8, long press SET to confirm or automatically 10 seconds after no key operation of the controller to return.
P0 refrigeration, heating mode:
In the main menu interface P0, press the SET key to enter setup, press “+” “-” to switch to heating mode [H] [C] for the cooling mode, press SET to return, long press SET or 10 seconds without button operation control automatically confirm completion
[C] under cooling mode: Measured value ≥ set point + hysteresis, relay; measured value ≤ set point, the relay off;
[H] Under heating mode: Measured value ≤ set point – hysteresis, relay; measured value ≥ set point, the relay off;
P1 hysteresis setting:
In the main menu interface P1, press the SET button to enter the hysteresis settings, press the “+” “-” to set hysteresis of 0.1 to 30, press SET to return after the completion of a long press SET or 10 seconds without button operation controller automatically confirm completion.
Cooling mode: When the measured temperature ≥ set value + return difference, relay, refrigeration starts; when the temperature measured value ≤ set value, the relay off, refrigerator off.
For example: the environment 30°C, 25°Cis set, hysteresis is set to 2°C, after power relay closed refrigeration starts, when the cooling to 25°C, the relay off cooling off, this time due to cooler have disconnected the temperature began to rise, when the set value rose to 27°C(set point + return difference) relay closes when the chiller is started again, and so forth loop between the control temperature 25-27°C.
Heating mode: when the temperature measured value ≤ set value – the difference back, relay, heater start; when the temperature measured value ≥ set value, the relay is switched off, the heater is turned off.
For example: 10°Cenvironment for the setting is 25°C, hysteresis is set to 2°C, after power relay closed the heaters, when heated to 25°C, the relay off the heater turned off, this time because the heater has been disconnect the temperature began to fall, down to the current set point 23°C(set-point – return difference), the relay is closed heater starts again, and so forth cycle to control the temperature between 23-25°C.
P2 highest temperature setting limit:
To avoid misuse of others led to the set temperature is too high risk, the highest setting of the thermostat capping defining the control thermostat setting range maximum temperature set point.
In the main menu interface P2, press the SET key to enter setup, press “+” “-” to set up the set temperature (maximum 110), press SET to return after the completion of a long press SET or 10 seconds without button motion controller automatically confirm completion.
For example: P2 is set to 60°C, the highest temperature measured only 60°C, when the temperature rises to 60°C, the digital tube displays “H H H”, the relay forcibly disconnected. If you want a higher temperature set point temperature to expand the scope, you need to adjust the upper limit set value.
P3 set minimum temperature limit:
To avoid misuse of others lead to the occurrence of ice blocking temperature is too low, the lowest of the thermostat set lower limit function, defining the scope of the thermostat setting controls the minimum temperature set point.
In the main menu interface P3, press the SET key to enter setup, press “+” “-” set the minimum temperature can be set (minimum -50), press SET to return after the completion of a long press SET or 10 seconds without keystroke controller automatically confirm completion.
For example: P3 is set to -20°C, the lowest temperature of -20°Ccan be measured, when the temperature was lowered to -20°Cafter, LED displays “L L L”, the relay forcibly disconnected. If you want to lower the temperature set point temperature to expand the scope, you need to adjust the setting value lower limit.
P4 temperature correction:
When the measured temperature and the standard deviation of temperature or because the user hardware has special needs, you can use this function to correct temperature corrected before correction + = temperature correction effective range of -7.0 to 7.0 (unit°C).
In the main menu interface P4, press the SET key to enter setup, press “+” “-” to set the correction value, press SET to return once completed, long press SET or 10 seconds without button operation controller automatically confirm completion.
For example: Normal display 25 degrees; temperature correction is 0:00 Show 25 degrees; temperature correction display 26.5 1.5 degrees; temperature correction -1.5 23.5 degrees when displayed.
P5 delay start time (unit: seconds):
When refrigeration or heater work required delay can be turned on delay function to protect the life of the equipment.
In the main menu interface P5, press SET key to enter setup, press “+” “-” Setting the delayed start time (unit: seconds), the delay time in the range of 0-600 seconds, press SET to return after the completion of a long press SET or 10 seconds without button operation controller automatically confirm completion.
Cooling mode: the first power on, if the current temperature ≥ set value + return difference when the chiller does not start cooling immediately after the need to run the set delay time to start.
Heating mode: the first power on, if the current temperature ≤ set value – the difference between the time back, the heater does not start heating immediately after the need to run the set delay time to start.
Downtime cooler or heater starts between two adjacent delay start time is greater than the set value, cooling starts immediately. Shutdown cooling or heater adjacent lapse between two starts is less than the delay start time setting, start again after the need to run chillers complete set delayed start time for the device to start. Delay time is counted down instantly. Delay start is set equal to zero off delay function.
For example: cooling mode set the delay to 60 seconds, if the current temperature ≥ set value + return difference when the thermostat start delay after power, after 60 seconds, turn cooler. When you reach the desired temperature of the refrigerant is stopped, then the start time, the next time the cooling starts, if after a time delay set by the cooler work immediately or to wait for the end of the timer to work.
P6 Buzzer switch (this function is invalid)
P7 temperature alarm function:
In the main menu interface P7, press SET key to enter setup, press “+” “-” to set the high temperature alarm temperature setting range is 0-110°Cor OFF to turn off this feature (factory default is 50°C). Upon completion press SET to return, long press SET or 10 seconds without button operation controller automatically confirm completion.
When the temperature reaches the set value of the high temperature alarm, digital display – – – simultaneously forced off the relay. When setting has been pressing “-” key, the setting value is reduced to 0, then click the “-” key to display “OFF”, at which time the function is off, the high temperature alarm function is invalid.
P8 restore factory settings:
Some man-made causes internal thermostat setting confusion, one by one to set the time-consuming, then use this function to restore the factory settings.
In the main menu interface P8, press SET key to enter setup, press “+”, “-” is set to [H], press SET to return after the completion of a long press SET or 10 seconds without button operation controller automatically confirm complete recovery factory settings. (Another way: In the off state, while holding down the “+” and “-” button, then on, all of the above parameters back to factory default settings.)


Reviews
There are no reviews yet.